Did you know that we’re able to animate the brake push rod of the rear brake, which goes into the master cylinder?
You didn’t?? How dare you!
Let me show you how it looks:
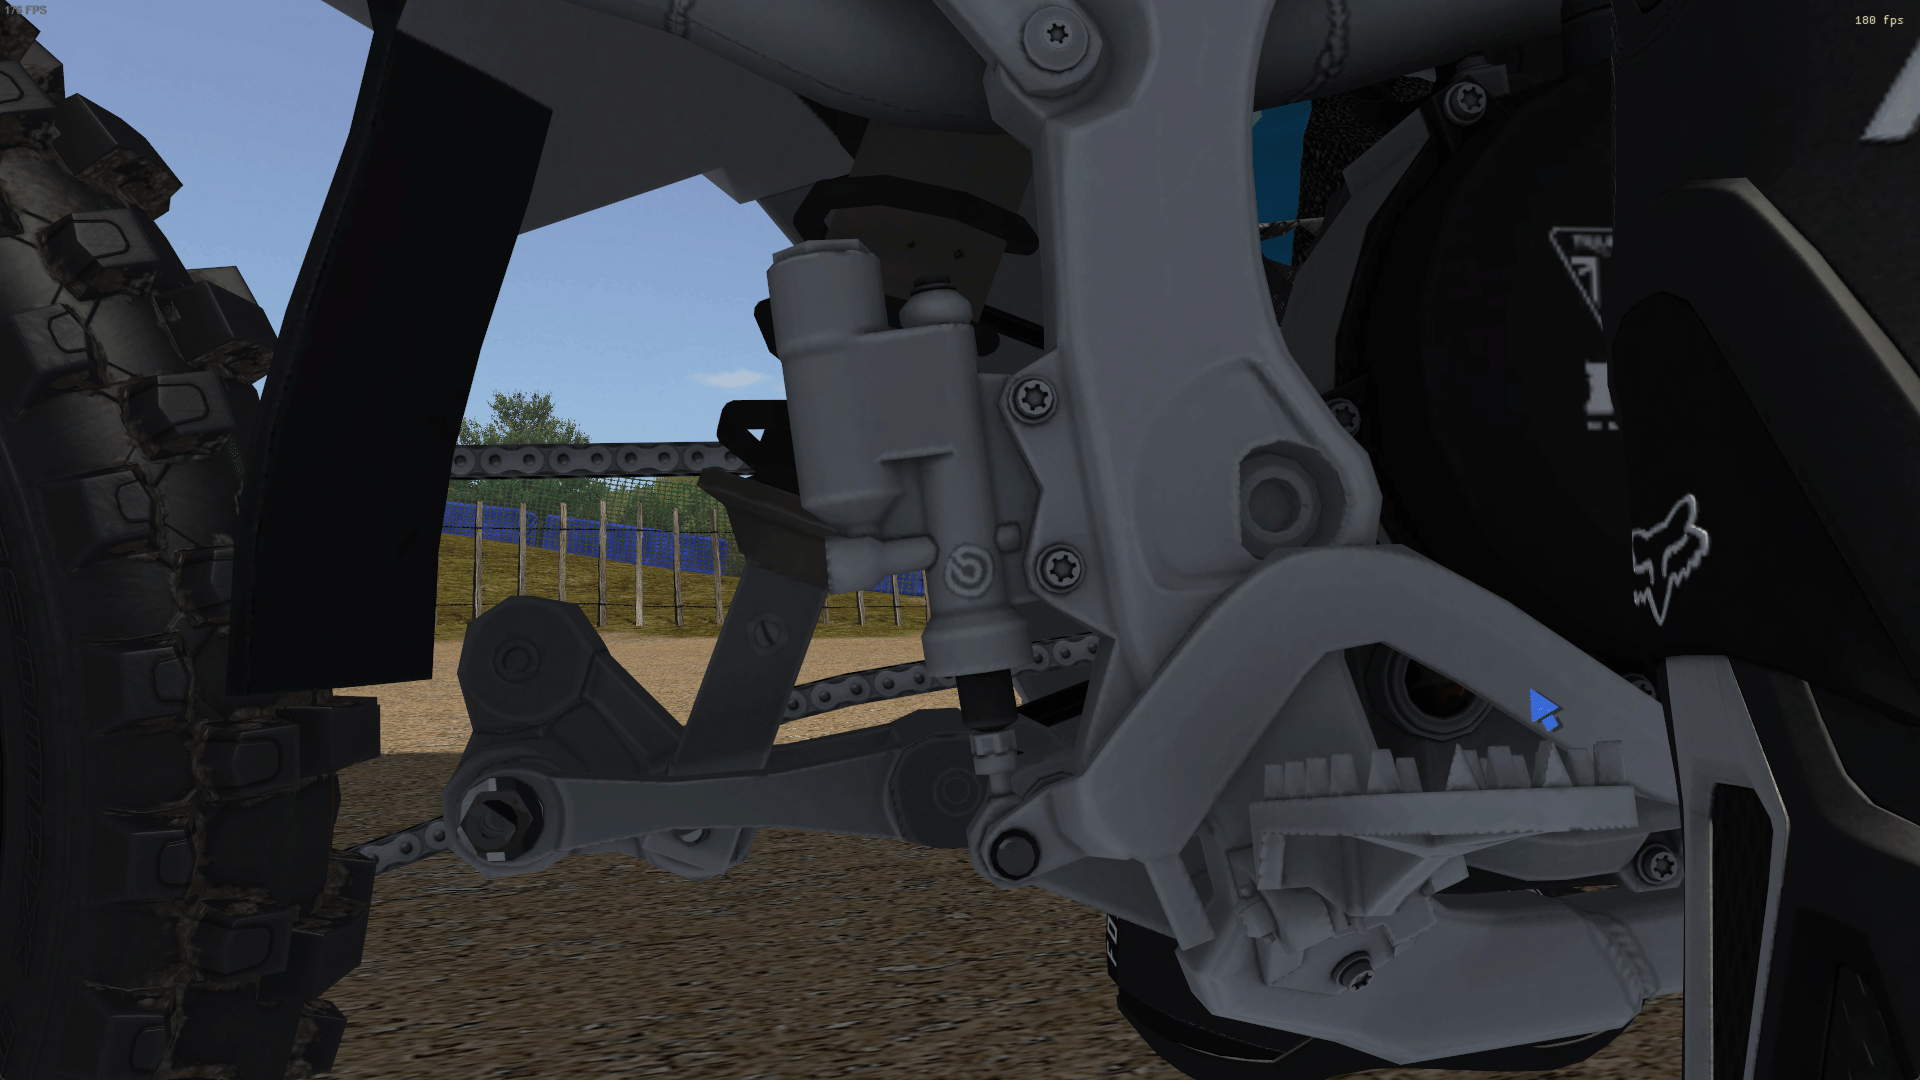
And if we wouldn’t animate it, it would look like this when being pressed:

What a difference, right?!
Well anyways, I’m here to put this to text and explain how the process is being done, first and foremost for myself as a saved memory to know where to look for (if this page stays up, of course).
Let’s start:
First, we need to have our model set up properly with a moving rear brake and its center set to where its rotational axis would be.
This isn’t really necessary as I’m doing double work by doing it all primarily via empty models (pivots), but I like having it sorted so here goes nothing. I usually start by creating an empty named rearbrake_lever (which will later be the part that’s going to be altered by the game) and put it where the rotational axis would be. I then parent the rear brake mesh to the empty and set its origin to the same position as the empty. You can do that by selecting rearbrake_lever, then Shift+S and clicking “Cursor to Active” – this puts your 3D Cursor to the empty’s origin. Now we select our rearbrake mesh, right click, set origin and click “Origin to 3D Cursor“. Done!
Let’s continue with the setup:
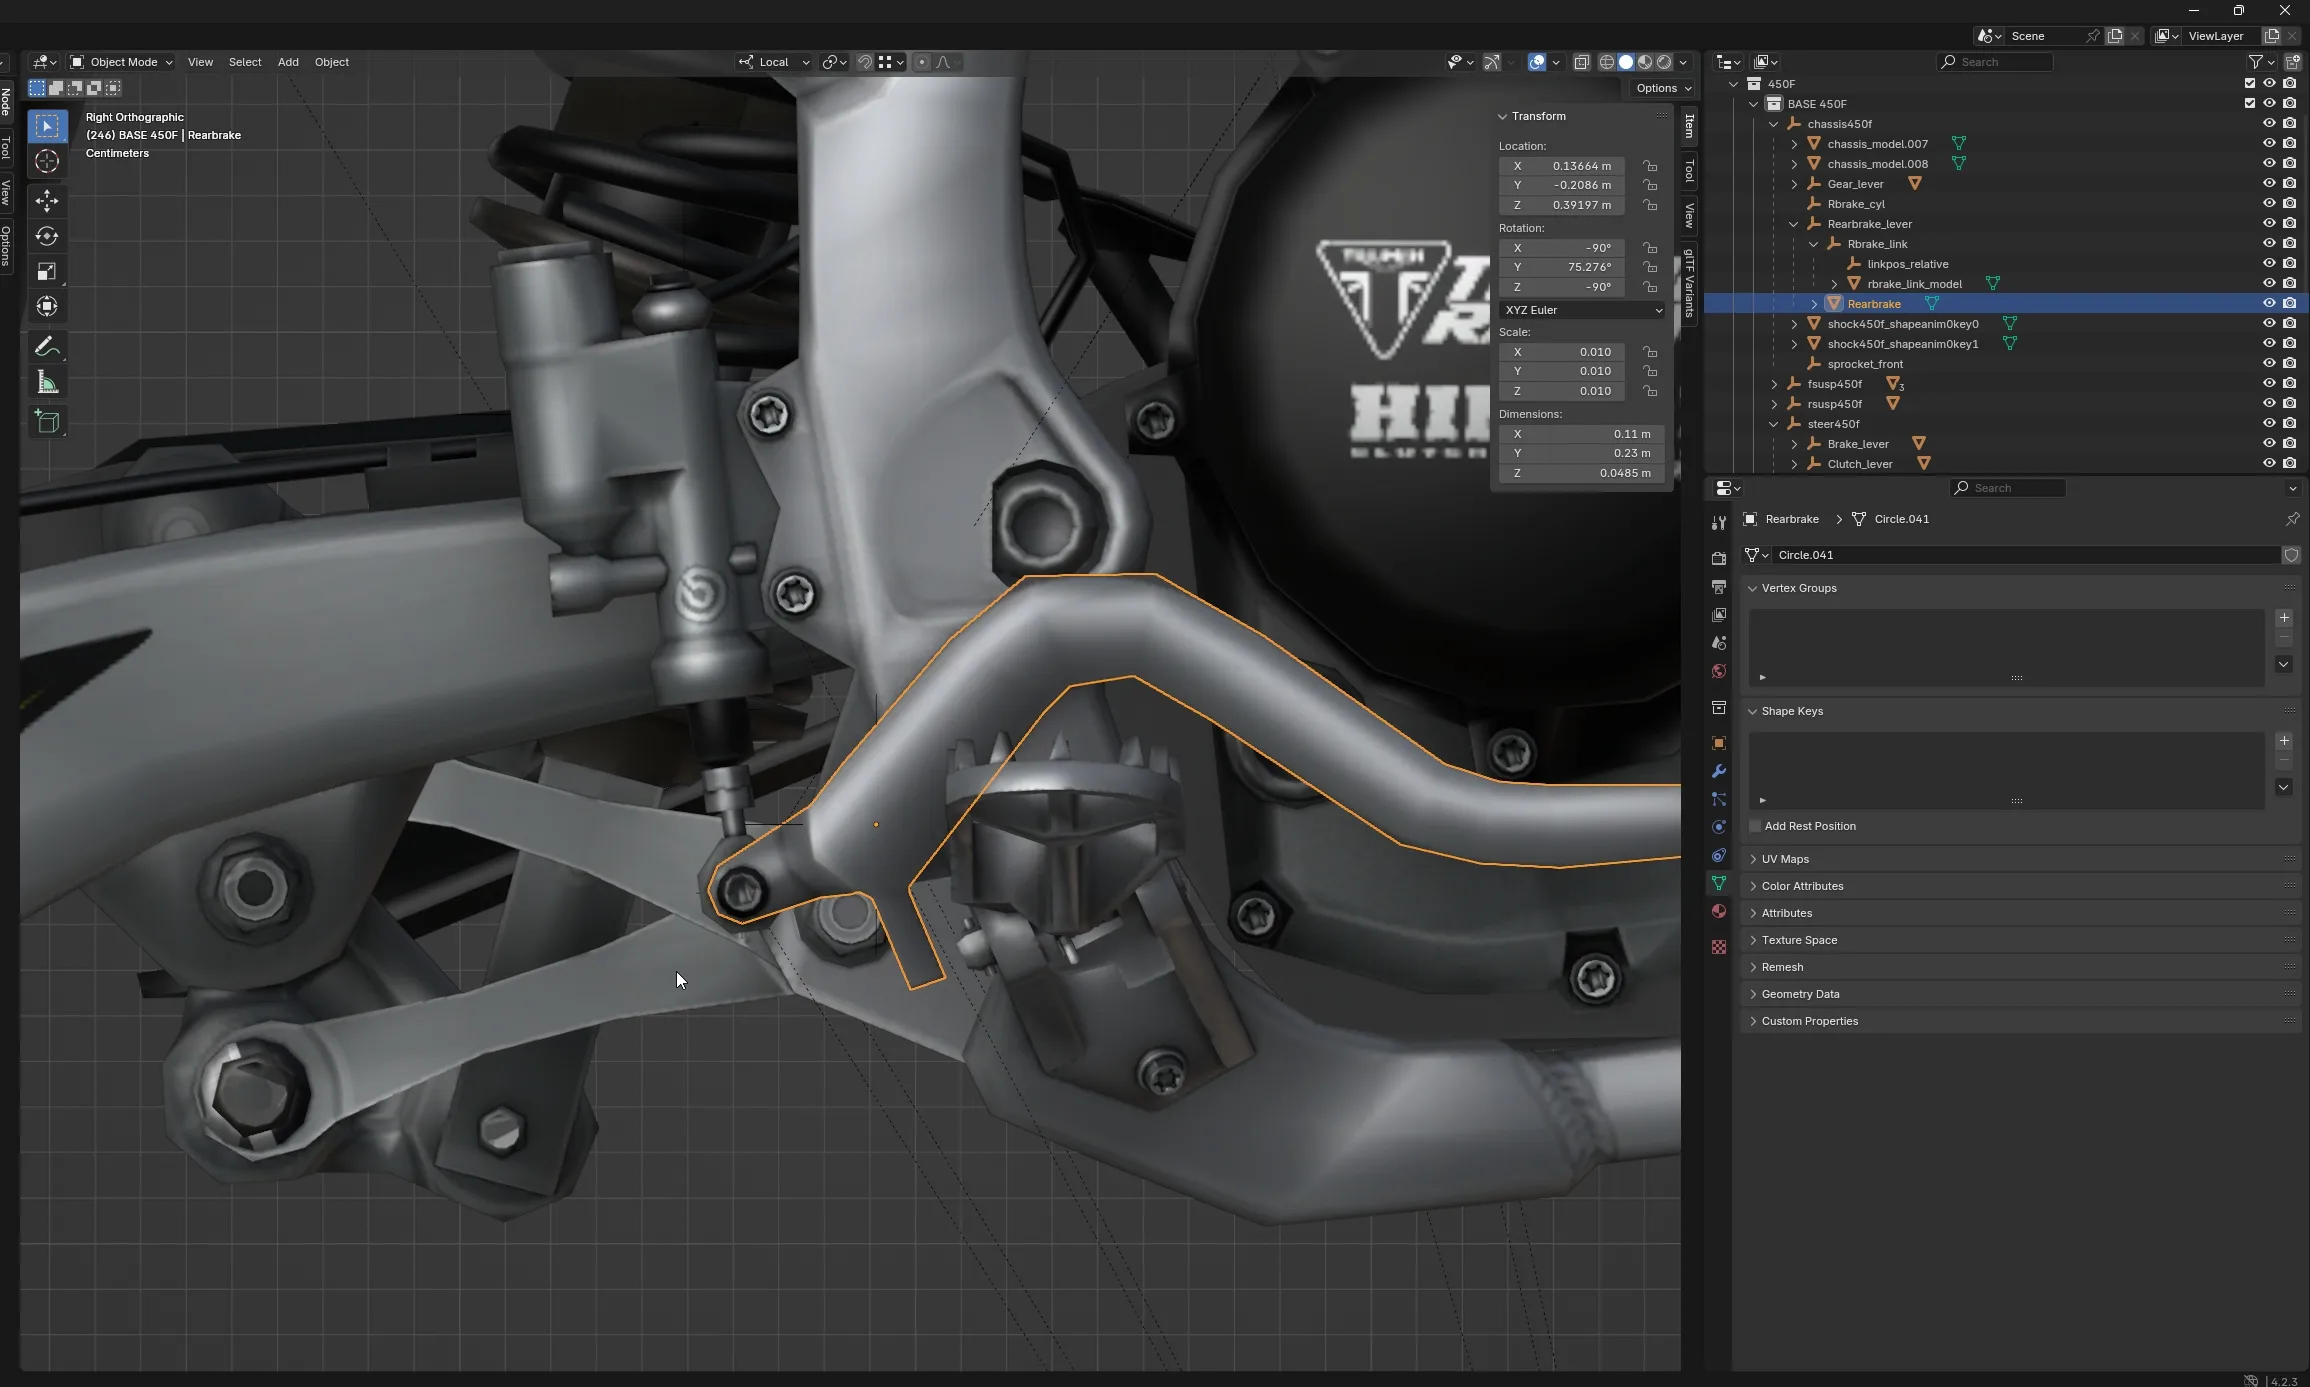
I call this mesh Rearbrake – don’t mind the capitalization, I’m having multiple model versions in one blend file and Blender allows you to have mesh names with different capitalization, like: rearbrake, Rearbrake, rEarbrake. If you’d have 3 rearbrake meshes the same name they’d call themselves rearbrake, rearbrake.001, rearbrake.002 etc.
Using the case-sensitive approach of Blender is a benefit for MX Bikes, because MX Bikes’ linkage system is case-insensitive, which means it translates all meshes and pivots to lowercase and looks for rearbrake, rearbrake or rearbrake inside parents. But more on that later.
So, next we need to make the link part – the brake push rod as it’s technically called – a mesh for its own, being parented to rearbrake_lever, so it moves with the lever:
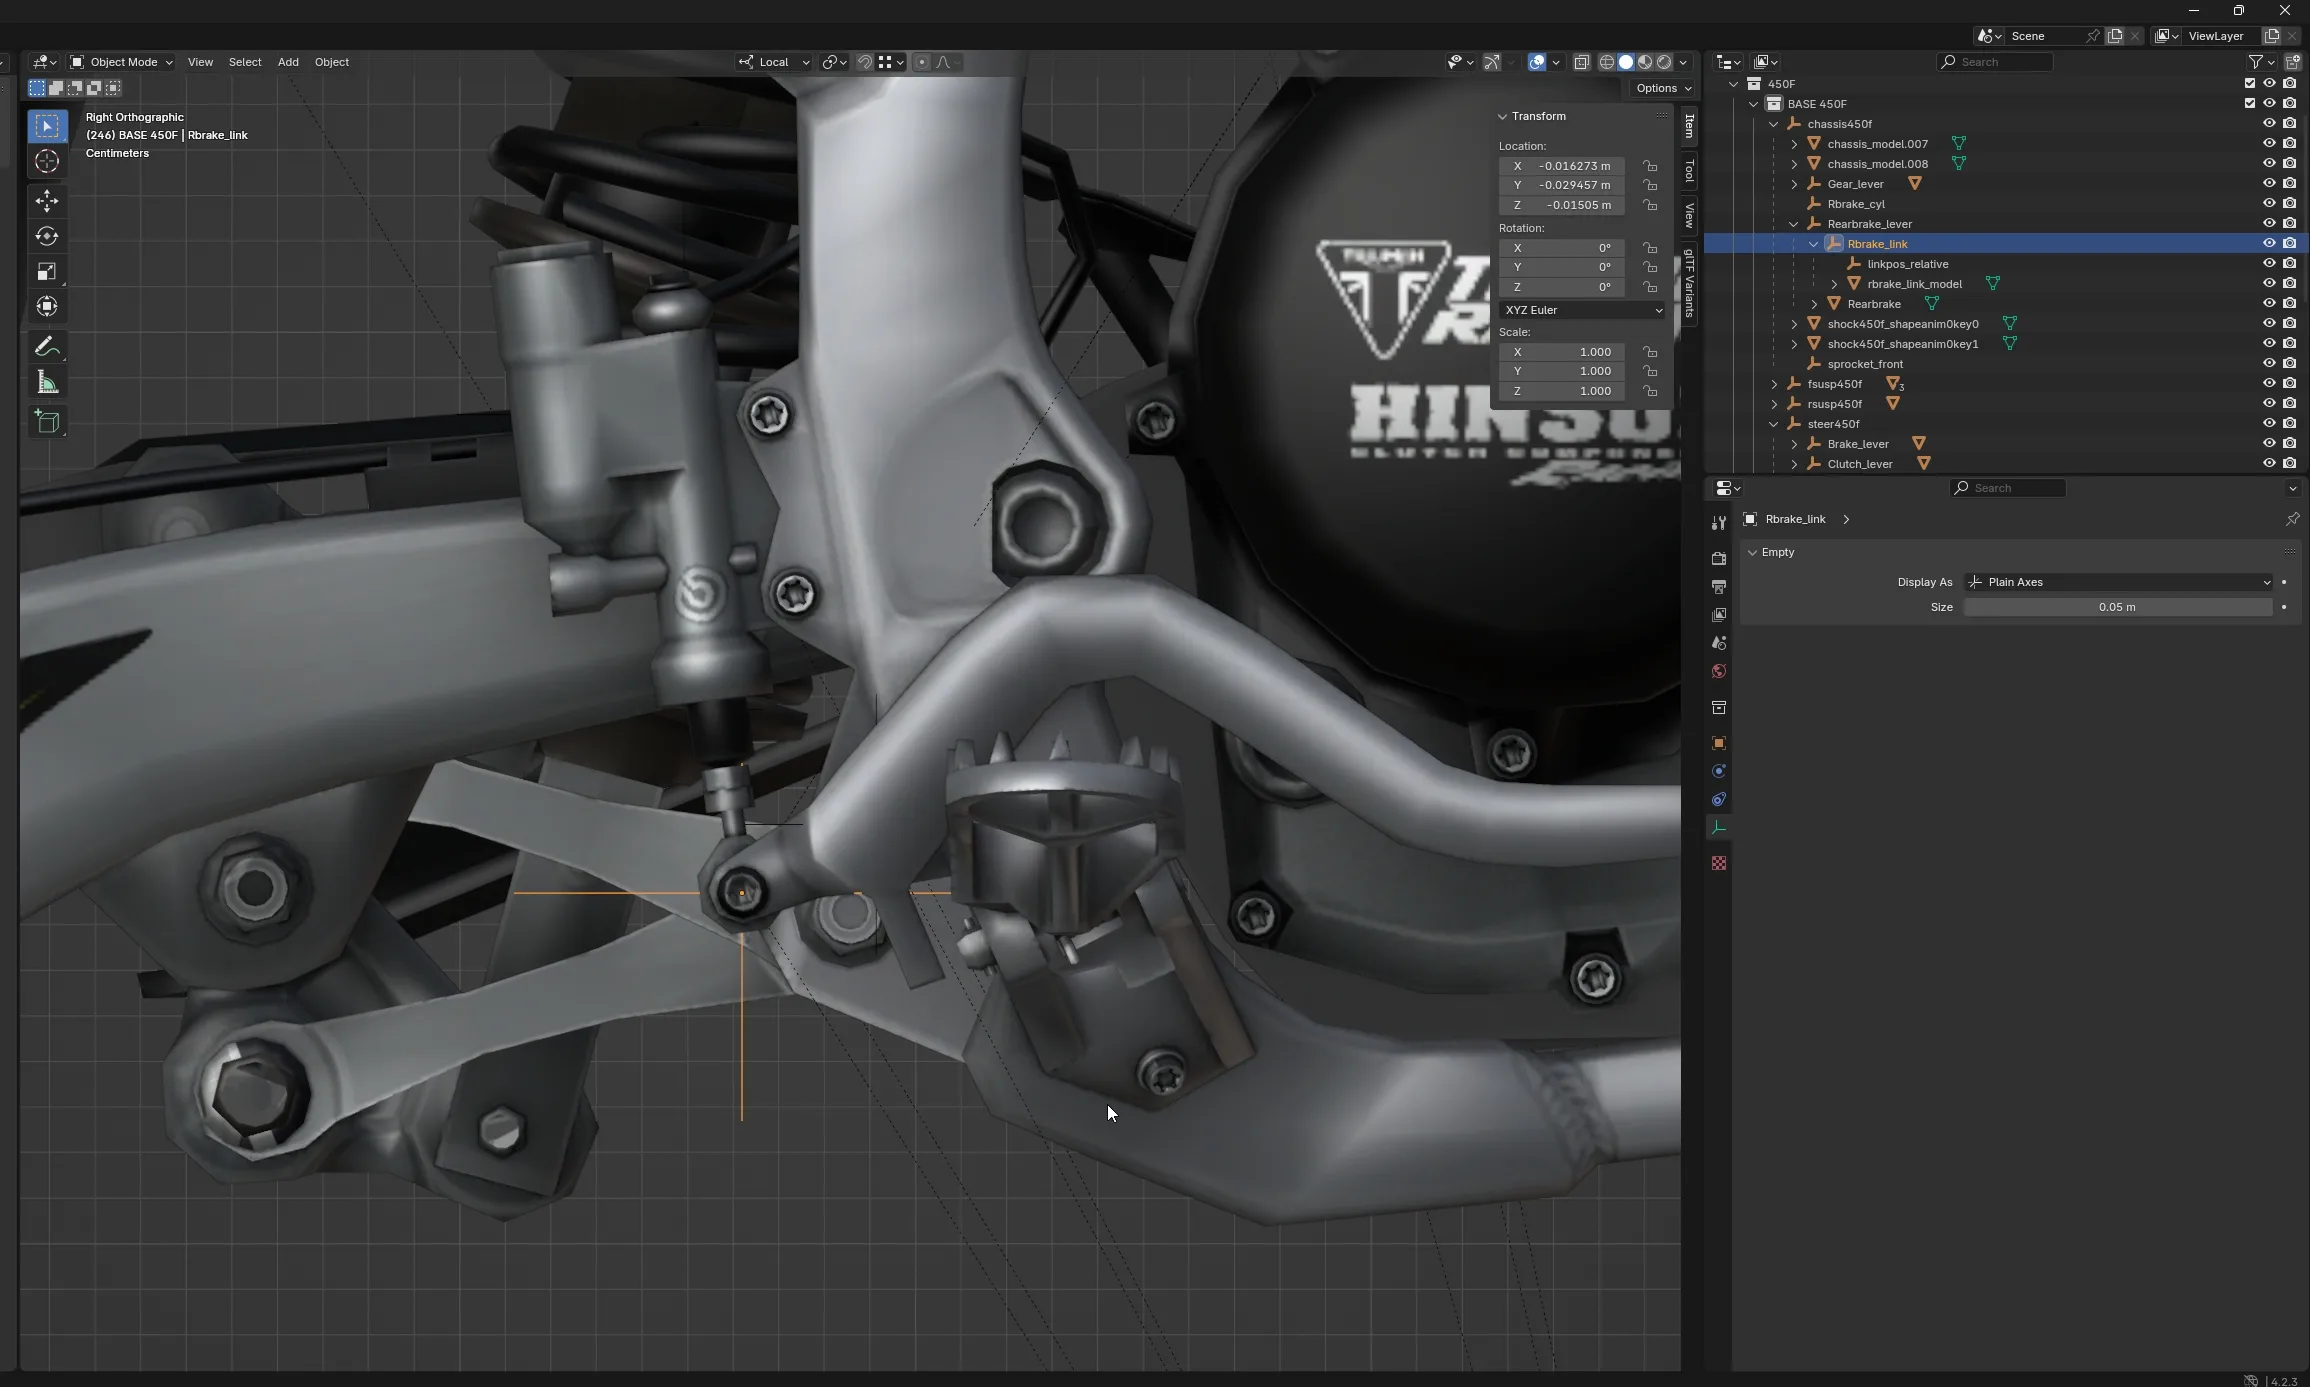
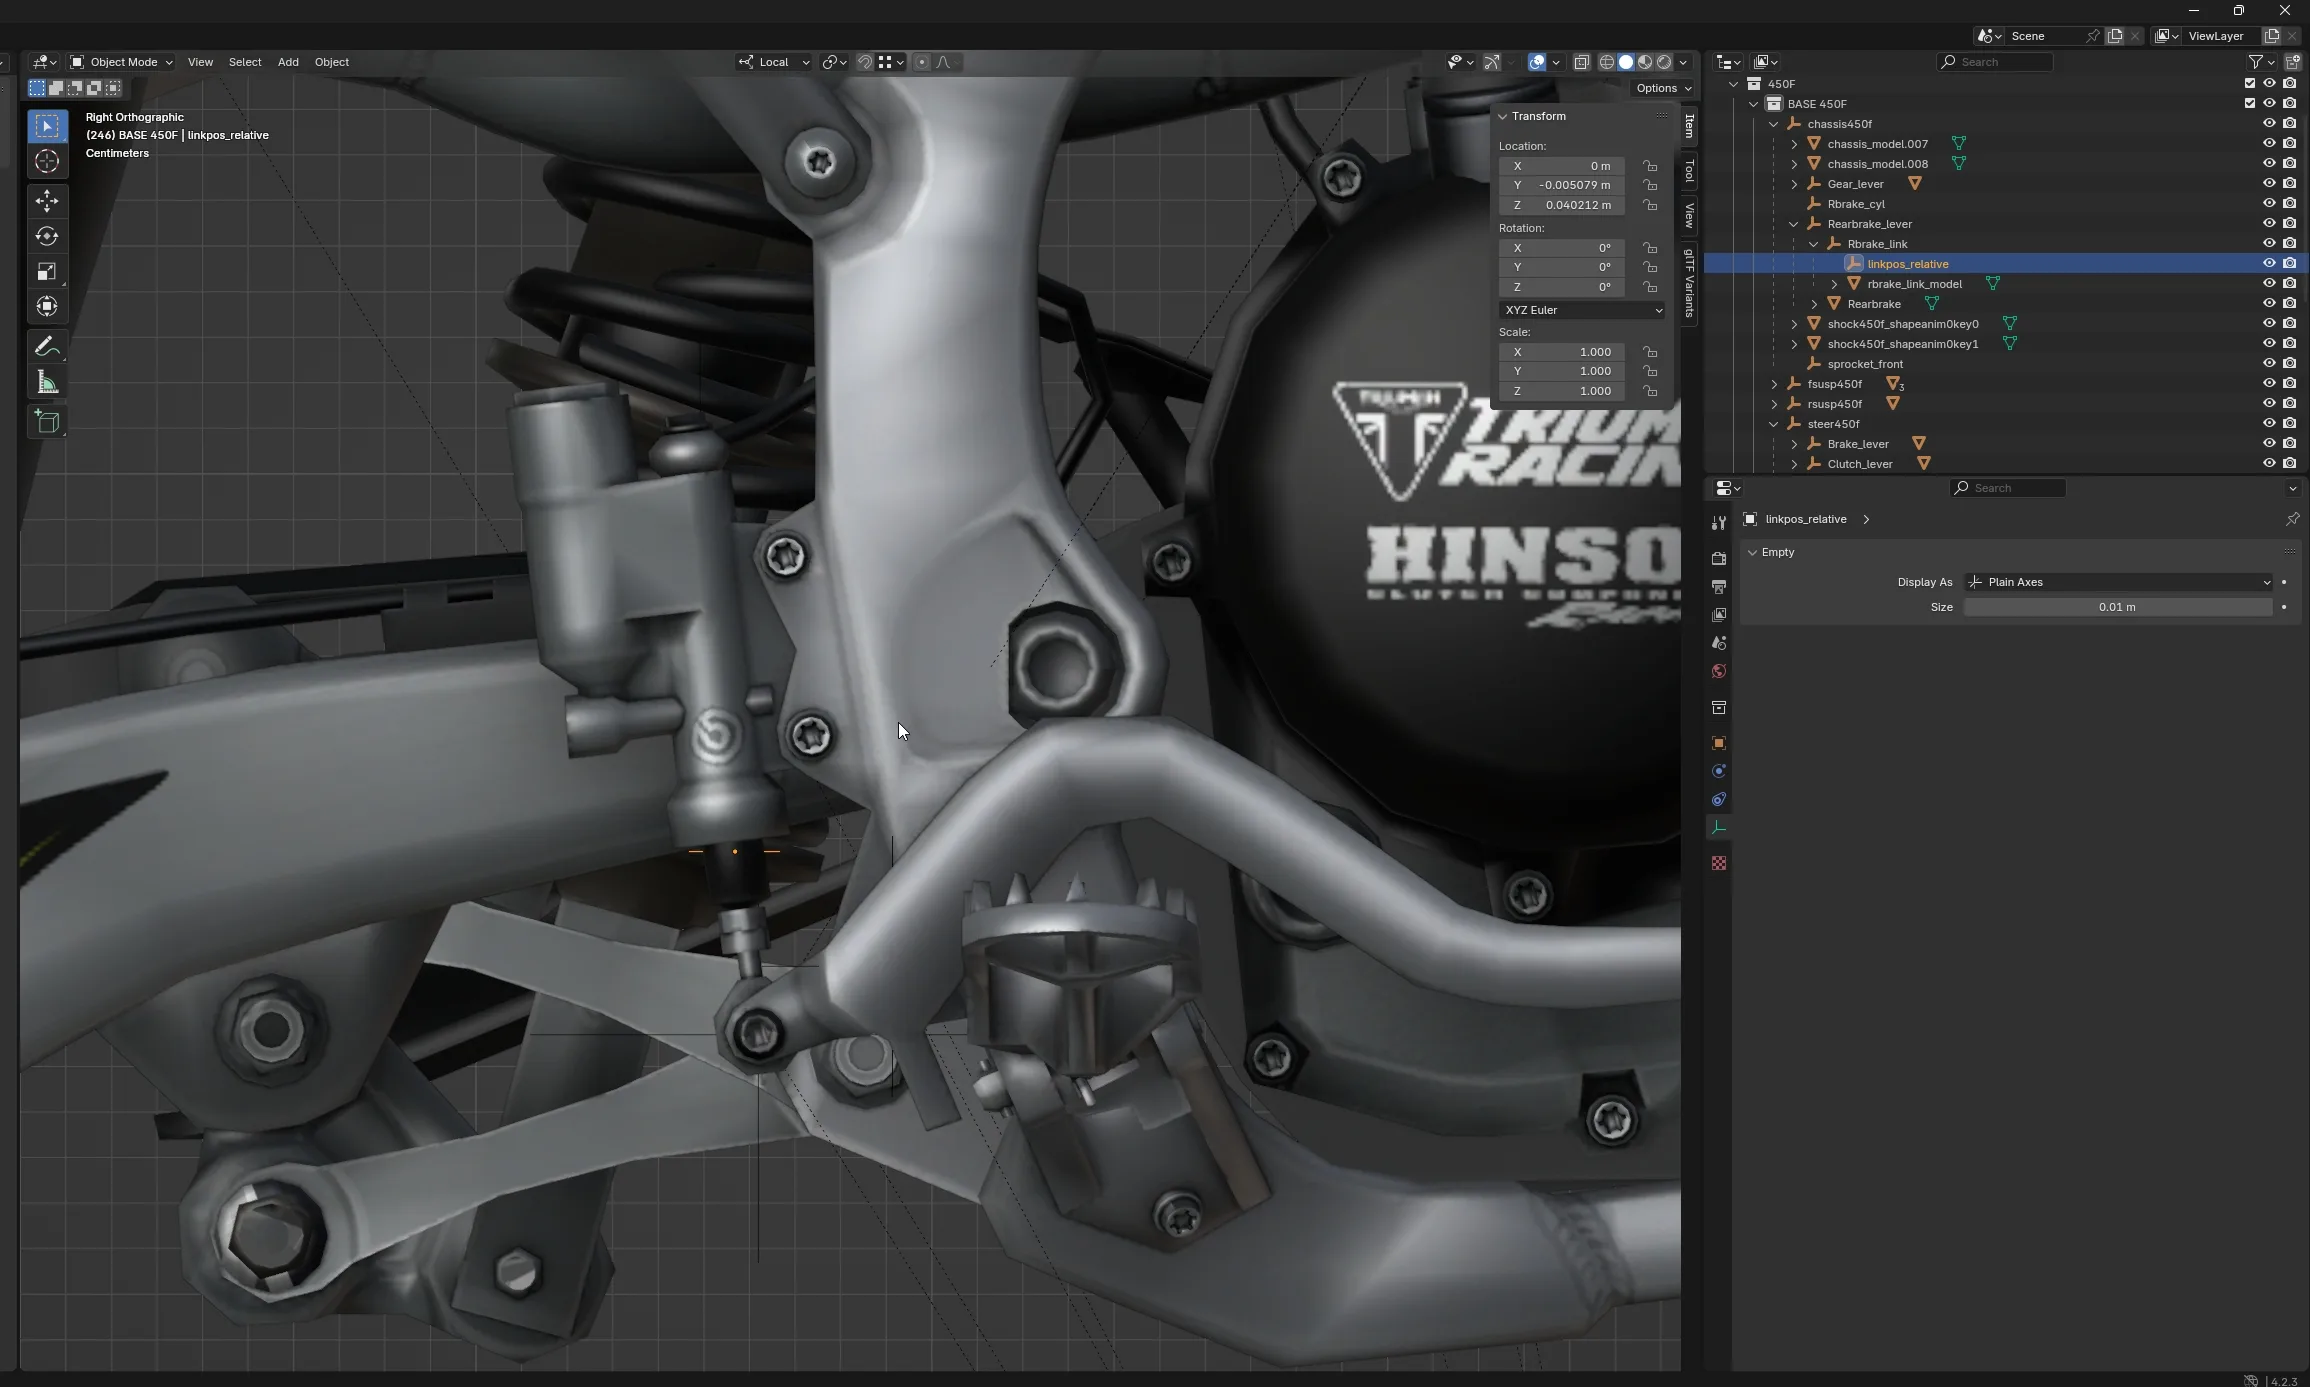
Now we’re going to create the empty we want to use as the rotational axis for the brake push rod. In this case I call it Rbrake_link, again – don’t mind the capitalization. Rbrake_link is positioned where the joint between the rod and the lever would be (see the orange dot in above picture). For the mesh, I called it rbrake_link_model but that name really doesn’t matter. Also its origin doesn’t really matter, however I did it the same way I did with the above example. I put the mesh origin to the same origin like the Rbrake_link. It must be parented to Rbrake_link!
Now we need to find the “end” of our push rod. This all will make sense once we’re at the end configuring the gfx.cfg. This will be our “ref obj” as it’s being called in MX Bikes Beta 20.
So, in order to tell the game how to align and move our push rod, we need to find a second position of the push rod – creating a symbolic “line”:
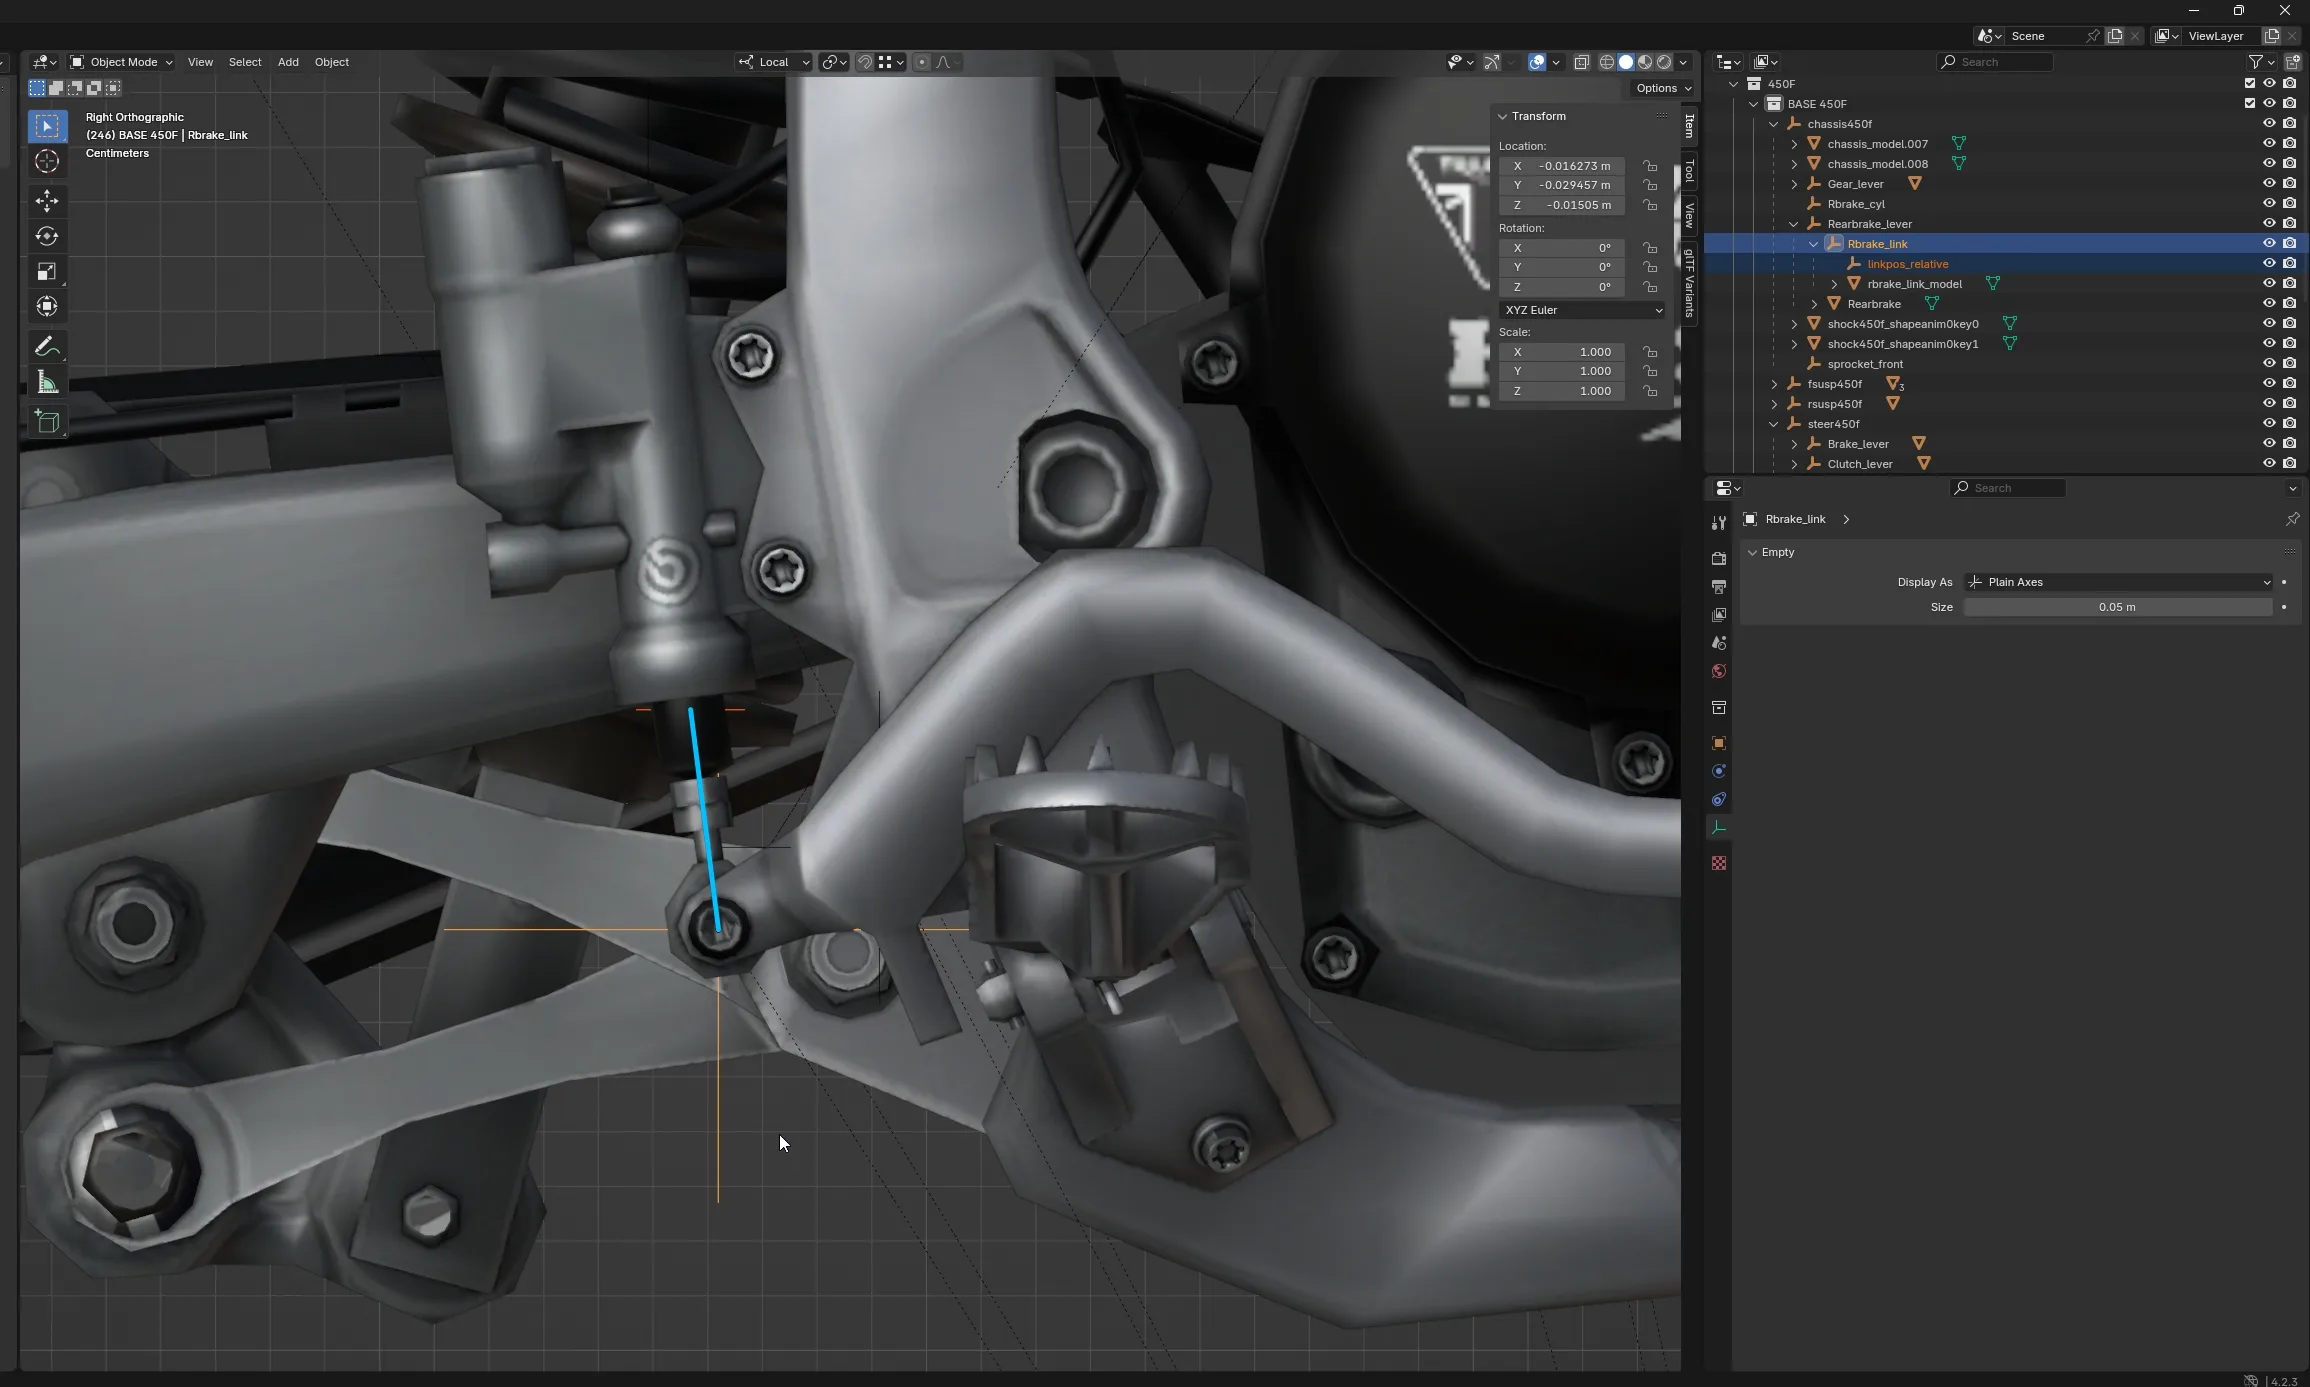
The easiest way to find this position is by doing the following:
- Select
Rbrake_linkwhose origin should be set to the joint we can see in the above picture (at the bottom of the blue line) - Shift+S and “Cursor to Active”
- Now Shift+A -> Empty -> Plain Axes (set its size to something like 0.01 or 0.05 as it’s unnecessarily huge per default)
- Parent this new empty to
Rbrake_linkif not done already - Now we move the “end position” where we want, ideally on a straight line to the “top end” of our push rod, just before the master cylinder
- Done! We found the location for our ref obj.
In my screenshots I’ve named this empty linkpos_relative, but I changed it’s name to rbrake_linkpos later on.
Now we need to tell the game where to aim at, our master cylinder:
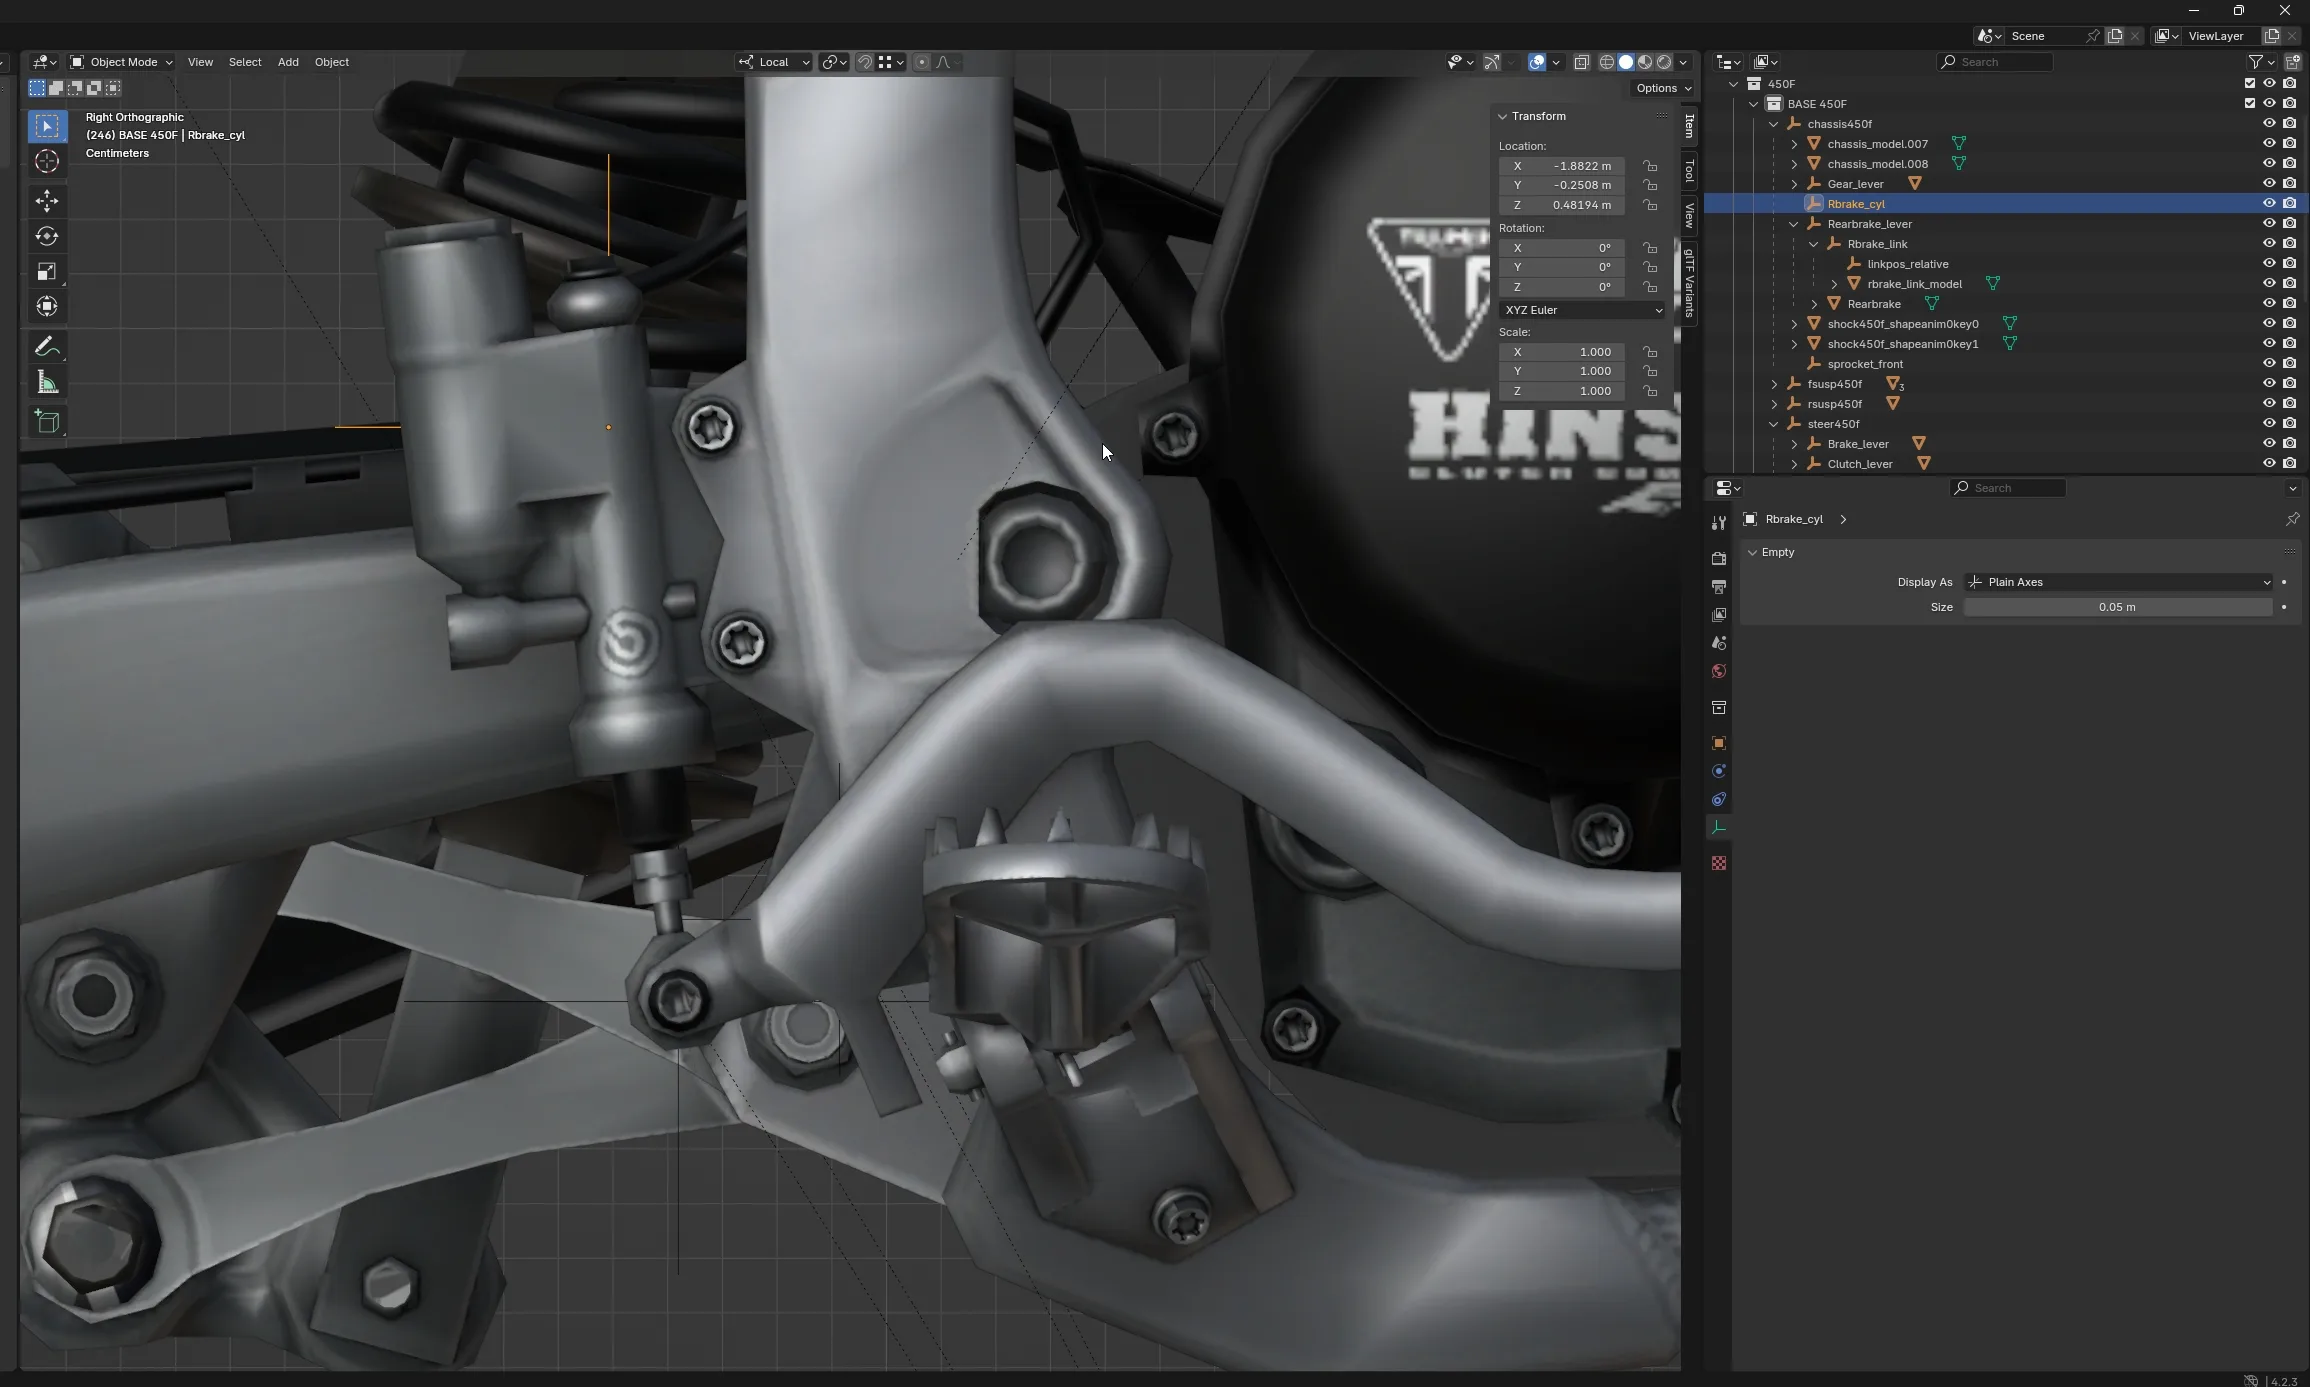
The easiest is to simply duplicate the rbrake_link empty so it’s on the same X position as the rod, preventing horizontal movement.
In this case I call it Rbrake_cyl and this must be parented to the chassis empty, because its position is static and DOES NOT rotate with the lever. (I had this issue for way too long until I figured it out, lol)
So far so good, we can export our model and do our first FBX2EDF conversion to make it work in game.
And that should be our base setup. Now we dig into the gfx.cfg file to add the new logic.
For this linkage setup we need to modify the section rearbrakepedal inside chassis:
chassis
{
    model
    {
        ...
    }
    shadow
    {
        ...
    }

    rearbrakepedal
    {
        name = rearbrake_lever
        axis = x
        maxrot = 10

        link = rbrake_link
        ref
        {
            obj = rbrake_linkpos
        }
        mastercylinder
        {
            link_obj = Rbrake_cyl
        }

    }

    ...
}
Let’s take a look into the code. In rearbrakepedal, we define the mesh or empty in the model we want to rotate when the rear brake is being triggered. As I said earlier, my rearbrake_lever empty is what I want to rotate along the X axis by a max rotation of 10 degrees. Sometimes, depending on how your origin is aligned, it might be x or x-, in this case it’s x and actually gets “pushed”. If you check in game and your pedal is being “pulled”, then you might need to negate the axis.
Now to the new stuff: link, ref + obj and mastercylinder + link_obj.
link is to define the mesh or empty of the push rod. So the part that should rotate on the joint and aim at the master cylinder. In this case our rbrake_link.
link = rbrake_link
ref defines the “end” empty we set up earlier. With Beta 20 we won’t need to put relative XYZ values anymore, we can just use the empty as reference and the game attaches to it.
ref
{
    obj = rbrake_linkpos
}
mastercylinder well there’s not much to tell. Our link_obj is where we want to aim at, so the Rbrake_cyl empty we created earlier.
mastercylinder
{
    link_obj = Rbrake_cyl
}NOTE: The rbrake_cyl part will be possible with the release of MX Bikes beta20 – it is not possible to use link_obj for this section in older game versions. At the time of writing this post, b20 was not yet public and was written for future reference!
Instead of creating the Rbrake_cyl empty and linking it via the gfx.cfg file, its location (relative to the chassis pivot) must be defined by X Z Y coordinates, so mastercylinder { x= … y= … z= … }. Same goes for the link, it’ll be linkpos { x= … y= … z= … } instead of ref { … }.
Did you notice something? It doesn’t matter if the object is RBRAKE_LINK rbrake_link Rbrake_link or similar. How helpful! (I believe I’m alone here)
However, we got it all set up now and we can now go in game and check if it actually works.
There’s a neat feature where we can debug IK Link, we can enable it by editing Documents/PiBoSo/MX Bikes/global.ini and adding this section:
[debug]
links=1
We can now go in game and we’ll see where the IK Link positions are with some coloured spheres:
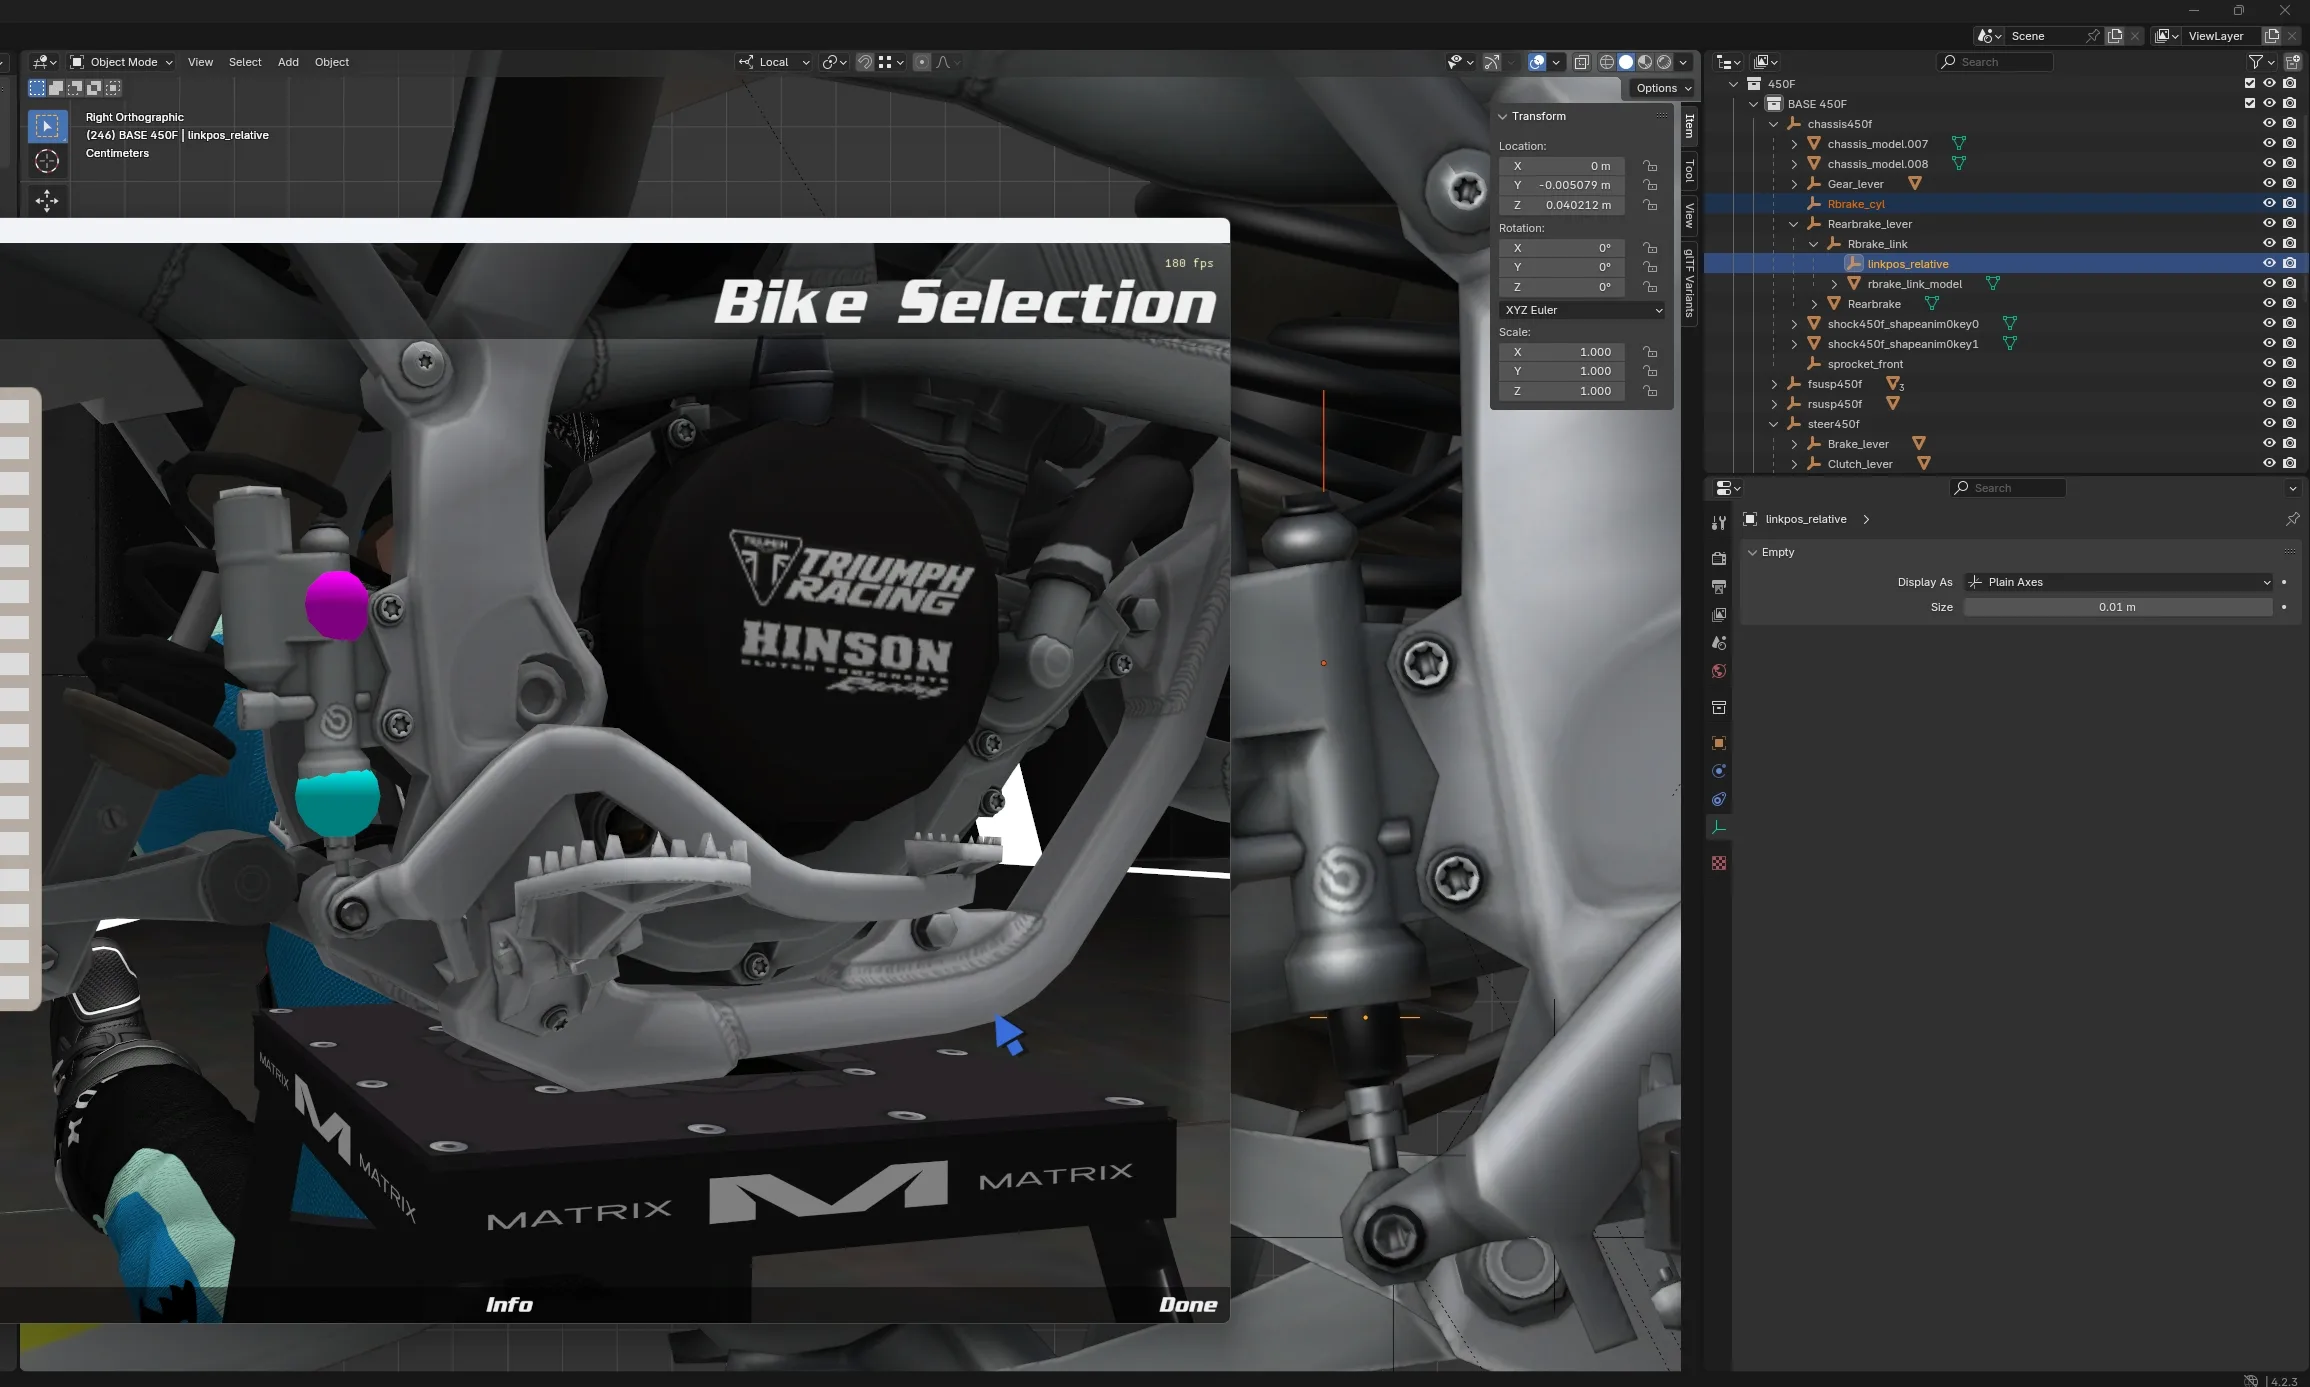
Et voila, it’s exactly where it needs to be! Unfortunately, writing this, when having IK Link debugging enabled, stuff is not being animated properly. In order to see it in game, we’ll need to set it to 0 again and restart.
If the positions are not where they should be, you need to tweak your settings. But here we are again at the game’s nature: trial and error!
I hope this is useful for bike modders. There’s plenty more to come regarding IK Links, especially with MX Bikes beta19c!

how to order enclomiphene cheap sale
online order enclomiphene cheap no prescription
sans ordonnance kamagra sans ordonnance comprime franche comte
kamagra sans ordonnance
ordering androxal generic best price
cheap androxal price on prescription
buy cheap generic online flexeril cyclobenzaprine
cheap flexeril cyclobenzaprine online no rx
dutasteride ONLINE FEDEX COD FREE CONSULT
cheap dutasteride buy dallas
order gabapentin purchase uk
how to buy gabapentin cheap to buy online
buy fildena uk buy online
get fildena cheap wholesale
online order itraconazole canada internet
order itraconazole cheap where
get staxyn purchase to canada
buying staxyn generic extended release
ordering avodart us prices
purchase avodart price generic
xifaxan online prescription
acheter xifaxan
discount rifaximin australia to buy
am a womani have emphysema low hemo etc dr wants to prescribe rifaximin
můžete získat kamagra přes přepážku
nás. lékárny pro kamagra bez r x